Sunday, 8 November 2015
Thursday, 5 November 2015
Free Motion Mavericks - Week 68 - Best Seen From The Back
Cushion covers are fairly quick to make as presents, and I have got half the quilting done on a cover I started earlier this week. This is the backing, calico, and the dark brown bobbin thread shows up well in today's poor light. The front is wide bands of different shades of brown, and the poor old camera just can't cope with it. Likewise, when sewing, I am having a bit of difficulty seeing where I am going. I am trying out different threads, using one shade for the main part of the leaves and another for the serrations all round them. This means I am going back and forth along the stems twice. It doesn't look too bad from a distance...
... but when looking closely you can see that the stems have four lines of stitching, which is a bit scruffy. This leafs looks particularly slapdash where it joins the stem...
...but on the right side the slightly scribbly bits hardly show up. I suppose that if I can't see where I am going off course it follows that the wobbles won't show up too badly.
As well as working in poor light (blame the rain), the calico is stiffer than the usual stuff I buy. It was so loaded with stiffener that it smelt of wallpaper paste, so rather than just adding water and using it to decorate an alcove, I washed it.
Not that you would think so, seeing this. This is what you get when your work creeps round the back of the machine and has a brief skirmish with the treadle belt. It is nothing drastic, it will come off easily enough, but it is on the inside and a shade of brown to match. If it weren't a present I would probably leave it.
Here goes for week 68...
The project in Week 67 that really caught my eye was Gwyned's Deconstructed Sunrise - version 3! She has put together a winning combination of subtle colours with a sunray free motion quilting design. If you haven't seen her blog post yet, nip over now and see more photos.
If you love free motion quilting, whether you are a beginner just taking the plunge, or you have reached the stage where you can do ostrich feathers with your eyes shut and still achieve perfect symmetry, then please link up.
Remember, FMQ is FMQ, whether your machine was made last week, or it is older than your granny.
Here are the very easy and slightly elastic rules:-
1. Link up with any recent post, ideally from the last week but within the last month, which features a free motion quilting project, whether it is a work in progress or a finish.
2. Link back to this post in your own post and/or grab the linky button for your blog's sidebar.
3. Visit as many of the other participants as possible and say hello in the comments box.
4. The link up will remain open for four days, from midnight to midnight GMT for the long weekend, Friday to Monday.
So far quilters from the USA, England, Wales, Australia, Canada, Germany, Holland, New Zealand, France and Macau have taken part. The first participant from each new country will get a special mention the following week.
Linking up to Sarah's blog Confessions of a Fabric Addict for Whoop Whoop Friday.
Wednesday, 4 November 2015
Vintage Book Review 3 - Complete Home Knitting Illustrated
Reprinted in 1946, Complete Home Knitting Illustrated, by Margaret Murray and Jane Koster, gives a fascinating glimpse of wartime Britain.
The summary on the title page states the book will show how to combine knitting with fabric, and to make new clothes from old, two very useful skills in times of shortage.
The trim lines of wartime fashion are shown to best advantage in this bouclé ribbed frock and neatly waisted moss stitch cardigan, which quite frankly would have taken me the entire duration to knit.
Quicker to knit are these short sleeved jerseys, knitted on size 8 and 10 needles in 3 ply wool, and teamed up here with tweed suits and lace up boots.
The illustrations are extremely clear, with plenty of drawings showing different methods of casting on and off, increasing and decreasing, making buttons and buttonholes, and everything a knitter needs to know to make the most of the patterns in the book.
These illustrations, showing how to carry the wool at the back of the work for Fair Isle knitting, are quite exceptional.
Also of interest is the section about continental knitting, which concedes that "it is much quicker than the English way." This was a method I hadn't even heard of when I encountered a German girl doing her knitting at a bus stop in Ireland in 1982. When I expressed amazement at the fact that she had the wool in her left hand and hardly moved her needles, she unhesitatingly informed me that the German way was much more efficient. Perhaps it is, but anyone who learnt to knit the English way at the age of six isn't going to change. Old habits die hard.
The book shows numerous different stitches, from lacy and delicate patterns for babies' and children's clothes, to stitches specifically recommended for men's garments. Feather rib is evidently the ideal stitch for the man who has the casual approach to digging.
This waistcoat is very smart and practical...
... with a pocket each for a packet of 10 Woodbines and a box of Swan Vestas.
The children's section includes all the itchy vests and knickers in 2 ply wool, babies' shawls, pilches and matinée jackets that are to be expected (and possibly dreaded) in old knitting books. This little jacket, however, could be made reasonably quickly, as it is knitted across the body and the ribbed effect is achieved with knit rows alternating with bands of stocking stitch.
Equally ingenious are these gloves, also knitted across the usual direction of work. Gloves figure large in the book, with patterns for gauntlets, open work gloves in cotton or wool, fingerless gloves and mittens. Keeping warm in the years of fuel shortages was a priority, and this photograph shows that staying warm in layers of wool could be achieved with some elegance.
Another preoccupation was making clothes last. This little girl is wearing a dress made from fabric from an old dress, and which has been enlarged with knitted inserts in the sides and a new knitted yoke and sleeves. Somehow she doesn't look too enamoured with the result. Perhaps it is a bit too hot and itchy around the shoulders to let her go tearing around after a tennis ball.
Possibly the most fascinating picture is this one, taken on a gloriously traffic-free corner in London. The outfit isn't much different from those worn by girls when I was a child. In fact, I could swear she has nicked my ankle socks and brown leather Start Rites. The truly fascinating feature of this picture is the white painted kerb, no doubt to prevent people from breaking their necks in the blackout.
By far the barmiest pattern in the book is this one, described as a helmet with ear flaps. Just an ordinary balaclava, (passé enough in itself unless you are knitting for a hearty outdoors type or a bank robber) but with the added feature of ear holes through which the wearer can pull his ears. It really doesn't bear thinking about. This man deserved a beer bonus for modelling this creation. He would have been ribbed something rotten next time he went down the pub.
Complete Home Knitting Illustrated is a truly marvellous book, but perhaps not for the faint hearted who baulk at the prospect of casting on 183 stitches in 3 ply wool on size 10 needles. It is packed with plenty of technical information, and patterns that can be adapted and updated, and it deserves a place on the bookshelf of every experienced and truly intrepid knitter.
Linking up with Connie's blog Freemotion by the River for Linky Tuesday
Sunday, 1 November 2015
A Picture for Sunday - Distant Rain
Ever-changing clouds over the Bristol Channel, photographed at the same time and from the same spot as this photo.
Thursday, 29 October 2015
Free Motion Mavericks - Week 67 - I Had A Little Nut Tree
My favourite nursery rhyme, turned into a 12 x 12 inch free motion quilted wall hanging:-
I had a little nut tree, nothing would it bear...
... but a silver nutmeg...
... and a golden pear...
There wasn't enough room for the King of Spain's daughter.
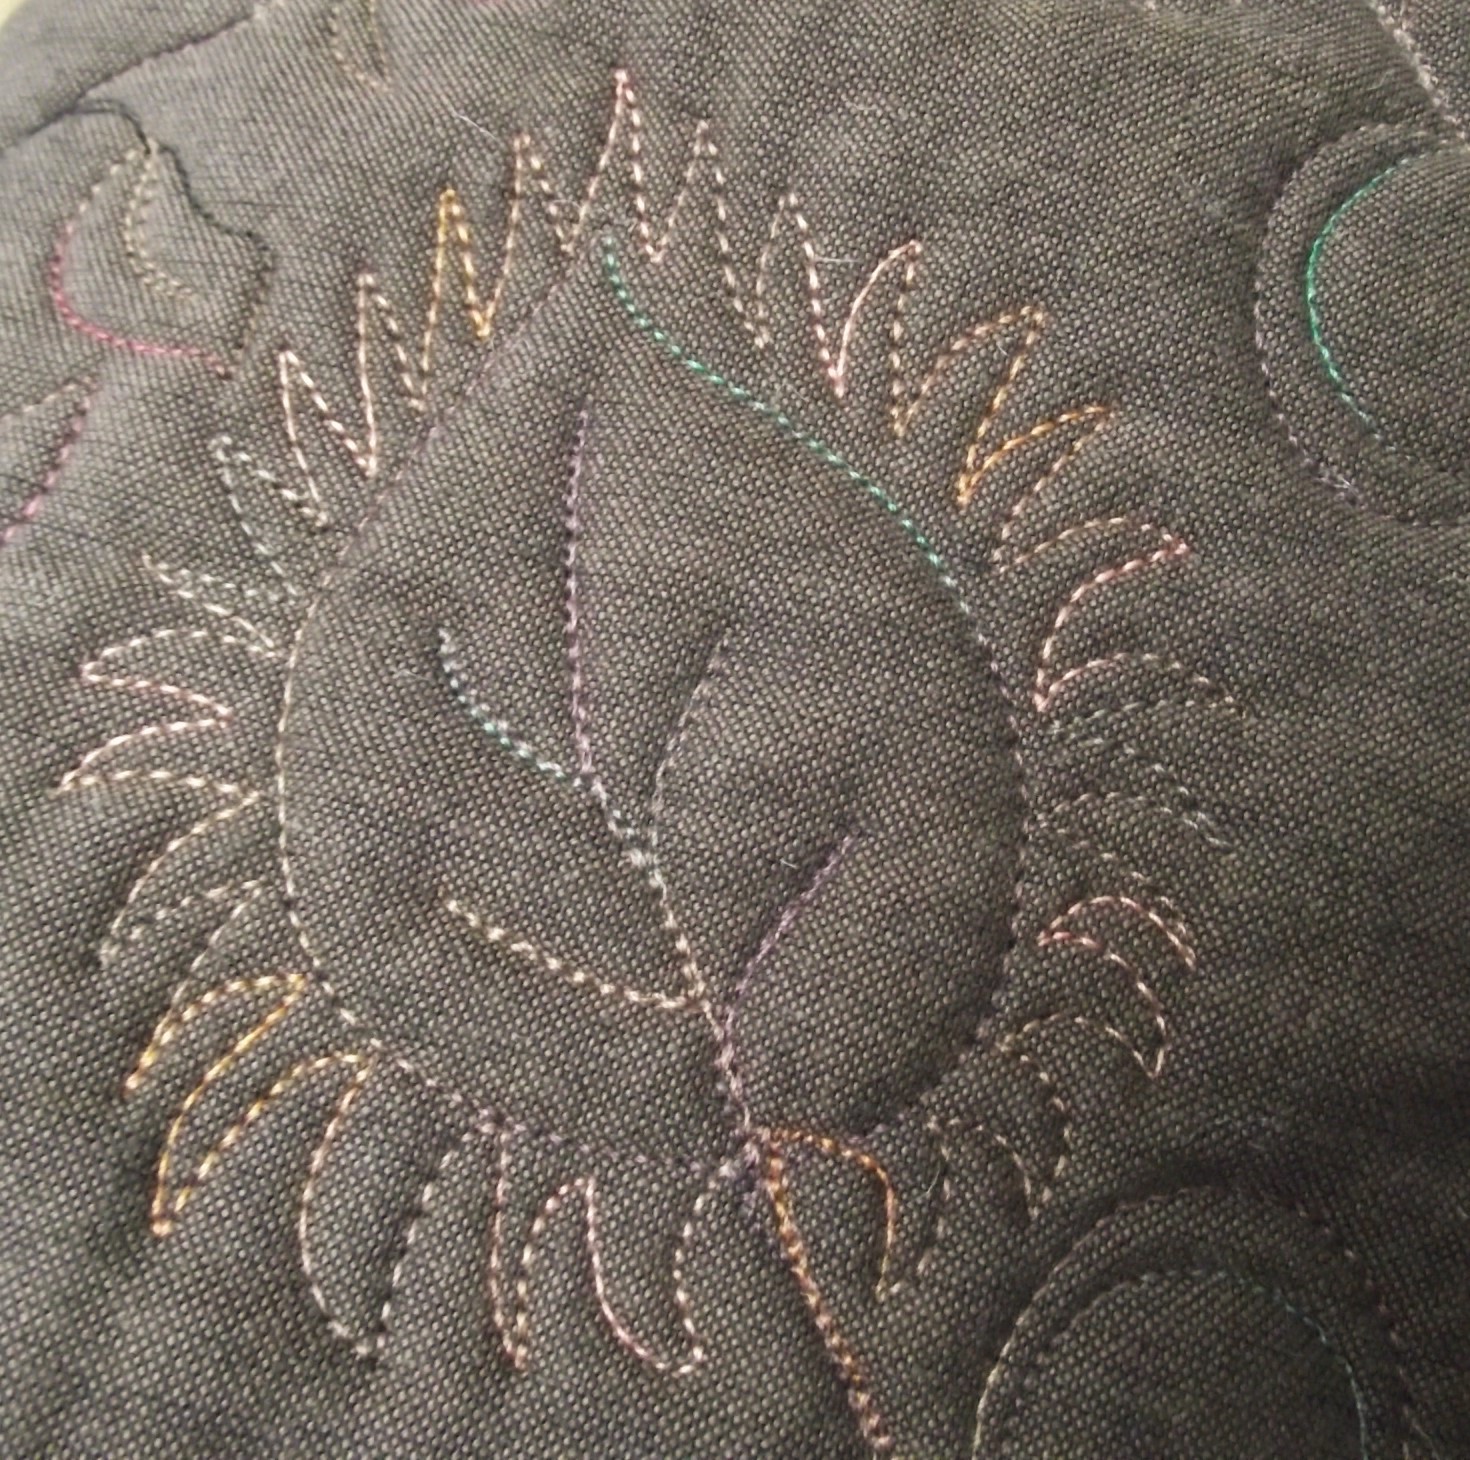
My original idea was to make it look like a book illustration, but while I was treadling away, stitching the leaves and stems for the flowers at the foot of the tree, I realised that the shade of green looked vaguely familiar.
In fact, it is staring me in the face every time I glance at the crockery on the dresser in the kitchen. Add to that the fact that to get the circle for the design I had drawn round an 11 inch dinner plate, the whole project turned into a picture of a plate.
Logic dictated that the background should be a table cloth, easily done by cross-hatching in variegated thread.
Doing the leaves was great fun, especially using thread with an occasional flash of pink.
The hand stitched pink flowers were the final touch. They seemed to take hours. The variegated thread gave an element of surprise, which relieved the tedium.
This the second quilt that I have made for the forthcoming show of 12 x 12 quilts at Midsomer Quilting. Now I shall have to wait until December to see what everyone else has made.
Here goes for week 67...
The project in Week 66 that really caught my eye was Heulwen's cushions for her nephews and niece, with a different design for each child, and free motion quilting to suit each design. The children will love them! If you haven't seen her blog post yet, nip over now and see more photos.
If you love free motion quilting, whether you are a beginner just taking the plunge, or you have reached the stage where you can do ostrich feathers with your eyes shut and still achieve perfect symmetry, then please link up.
Remember, FMQ is FMQ, whether your machine was made last week, or it is older than your granny.
Here are the very easy and slightly elastic rules:-
1. Link up with any recent post, ideally from the last week but within the last month, which features a free motion quilting project, whether it is a work in progress or a finish.
2. Link back to this post in your own post and/or grab the linky button for your blog's sidebar.
3. Visit as many of the other participants as possible and say hello in the comments box.
4. The link up will remain open for four days, from midnight to midnight GMT for the long weekend, Friday to Monday.
So far quilters from the USA, England, Wales, Australia, Canada, Germany, Holland, New Zealand, France and Macau have taken part. The first participant from each new country will get a special mention the following week.
Linking up to Kelly's blog My Quilt Infatuation for Needle and Thread Thursday
and Sarah's blog Confessions of a Fabric Addict for Whoop Whoop Friday
and Amanda Jean's blog Crazy Mom Quilts for Finish It Up Friday.
Monday, 26 October 2015
Quilt Label and Hanging Strip Combined
Finished today, a 12 x 12 inch quilt. Here is the back view, with the title.
Rather than do a label and a hanging strip separately, I like to combine them into one job. Here is the strip, a two and a half inch wide piece of calico, with the selvedge running along the lower edge. I have turned under the raw edges on the sides with a single fold and done three lines of machine stitching to prevent fraying. Two lines would probably do, but I am just making extra sure.
To mark the centre of the strip I have made a light crease, and the pin marks the centre of the top edge of the quilt.
Next, I place the seam guide on the machine right up against the side of the foot, and adjust the stitch length to its longest setting.
Then, lining up the crease with the pin, I sew the strip to the top edge of the quilt. To make sure the strip doesn't shift from position, I start from the centre and stitch one half in place first.
A long stitch is handy because it is quicker to do, and in effect it is just tacking the strip into place.
Now the quilt is turned over and stitched from the other side.
At each side there is plenty of room for the rod to emerge from under the strip, and the strip is well clear of the corners.
The raw edges are going to be covered with the binding. I have already started the binding - the pink stitching in this photo is the first line of stitching, which attaches the binding to the front of the quilt. I always do the binding entirely by machine.
Here is the method I use, and which I adapt slightly for densely quilted wall hangings - firstly, there is no need to stitch around the edge, because with dense quilting the edge is already firm and stable: secondly, I start by attaching the binding to the front, and then fold it to the back for the second line of stitching.
To reduce the bulk inside the binding, I trim the strip as near as possible to the machine tacking.
Then I turn the binding to the back and machine stitch it into place.
Before hand stitching the lower edge of the strip to the back of the quilt, I use hair grips to fold it up a fraction against the binding and hold it secure. This gives a little fullness to accommodate a rod without putting the front of the quilt out of shape.
Finally, if I need to add any more writing, I slide a fold of paper inside the strip just in case any permanent ink soaks into the quilt. Just think how disastrous it would be to wreck a quilt at this stage. No, it doesn't bear thinking about.
Sunday, 25 October 2015
Subscribe to:
Comments (Atom)
